French Inspired Spring Top Tutorial

Materials
47" by 30" Main Cotton Fabric for top (you may need more or less - check measurement guide in Step 1)
10" by 5" of Main Cotton Fabric for Tab
14" by 10" Contrasting Knitted Fabric
2 Large Buttons
Matching Thread
14" by 10" Contrasting Knitted Fabric
2 Large Buttons
Matching Thread
2 x 11" of 1/4 Inch Elastic
Step 1: Cut Main Fabric
Cut the length of the main cotton fabric your desired length from shoulder to hip (or waist) and add 1 inch for seam allowances. To cut the width measure your bust and add 10 inches for a bit of room and seam allowances!
Step 2: Sew Side Seam
For this garment you simply fold the fabric in half, right sides together and sew a 1/2 inch seam. If you prefer you can sew both side sems but I left one as a fold! Overlock seam open and press.
For this garment you simply fold the fabric in half, right sides together and sew a 1/2 inch seam. If you prefer you can sew both side sems but I left one as a fold! Overlock seam open and press.
Step 3: Cut Neck Hole and Arm Holes

Cut a slight curve at the arm holes as shown.
Cut the neckline deeper at the from than the back.
You can use an existing tee or singlet as a guide or just rough it as I did!
Step 4: Sew Shoulder Seams
Sew each shoulder with a 1/2 inch seam, overlock and press open.
Step 5: HemFold hem over 1/4 inch twice and press. Edge stitch.
Step 6: Sew Arm Holes and Elastic
Now here is a bit of fun...you know how you try hem an armhole and it runs out of fabric at the join (under the arm)...binding is often a good solution to this, or adding a sleeve, but instead of these options I chose to make a little cap sleeve out of it by adding elastic to the top section of the hole.
Now here is a bit of fun...you know how you try hem an armhole and it runs out of fabric at the join (under the arm)...binding is often a good solution to this, or adding a sleeve, but instead of these options I chose to make a little cap sleeve out of it by adding elastic to the top section of the hole.
To do this...
Fold and pin 1/4 inch and then a 1/3 inch on the armhole at the shoulder seam. Make a casing that is 17" in length (centred on the shoulder seam). Edgesitch casing. Repeat on other armhole. Thread one of the 11" of 1/4 inch elastic through the casing, stitching at the opening and closing once threaded through. Go back and forth over each end to ensure that it is secure. Repeat on other armhole.

Finish off the rest of the armhole by folding it over twice and tapering it off to the underarm join, which it should naturally do. Edgestitch.
You should now have lovely cute elastisised cap sleeves!
Step 7: Sew Neckline
Step 7: Sew Neckline

Cut a bias piece of fabric, use bias tape or a knitted fabric for this step. Measure your length by the neckline plus an inch for seam allowance. For the width measure how deep you want your trim and then multiply by 4. For this top I used a finished width of 1/2 - so I cut the red knitted fabric 2 inches wide.
Sitich the ends of the fabric (the width), right sides together with a 1/2 inch seam. Open seam and press.
Pin the fabric to the neckline with the seam on the side at the shoulder seam (I used the side that I intended the bow to go on and hide). Sitich a 1/2 inch seam (or your chosen width). Fold the fabric over twice and pin to the inside neckline. Handstitch the inside neckline.
Step 8: Sew and Attach Tab
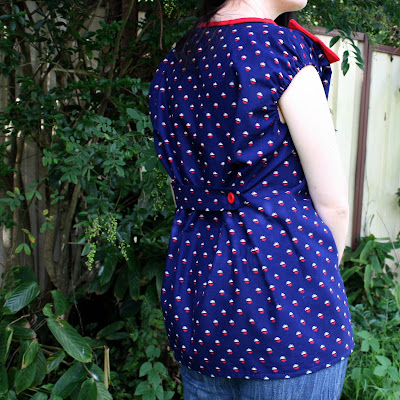
 Cut out a piece from your off cuts measuring 10" by 5" . Right sides together, stitch a 1/2 seam allowance around 3 sides the tab, shaping one end as desired (I used a point). Turn the tab the right side out, tuck 1/2 inch of the open end in and topstitch. Place your tab and buttons where desired, I placed mine at my upper waist to bring more shape to the top. I placed one button as a station for when it is on the 'loose' setting and one further away to create the gathers. The measurements for my placements are as follows:
Tab stitched: 3" from left side seam on back of top (approx. at my waist - 13" above hem)
First Button: 10" from left side seam on back of top at same height as tab
Second Button: 20" from left side seam on back of top at same height as tab and button 1

To attach the tab I used straight stitch in a x shape as above to reinforce it! Sew a button hole onto the tab and attach buttons to top.
Step 9: Sew a Bow
The bow is made up of two pieces of knitted fabric - the first main piece 10" by 5" and the narrow centrepiece 4.5" by 4". Fold the main piece in half and sew a 1/2 inch seam on each side and along the bottom, leaving a 2 inch opeing at the centre of the bottom. Clip the corners and turn the right side out. Hand sitch the 2 inch opening shut.
Fold the narrow strip long right sides together. Stitch a 1/2 inch seam and turn the tube right side out. Finish the edges by turning one 1/2 inch up and tucking the other end inside and hand stitching them together.

Concertina the bow in the middle and wrap the narrow strip around it, join in the back with hand stitching. Also hand stitch the sides to little bits of the bow as pictured to secure. I know it looks a bit messy but it remains unseen - you can always tidy yours up a bit more! Attach a safety pin and your bow is ready to attach to your top....or anything in your wardrobe!
Step 10: Pose, Shoot and Blog! Strike a pose...shoot...and blog about your sweet new top!
Don't forget to leave a comment with a link to your top so we can all check it out!
Also let me know if you have any issues with this tutorial and I will fix it up!
Happy Sewing!


this is very cute! it looks great, but it is so simple. thank you for the tutorial!
ReplyDeleteVery cute! I love the back tab.
ReplyDeleteThat neckline with the bow is so pretty. Love this!
ReplyDeleteTres sweet! Love the choice of fabric.
ReplyDeleteThanks so much!
ReplyDeleteloved it:) the bow s super cute:)
DeleteHow sweet and clever indeed! Love the bow. :)
ReplyDeleteThis is very cute, love the fabric's pattern too! Thanks for sharing the tutorial, I linked it in a series I'm writing for my blog (http://rock-n-roll-stops-the-traffic.blogspot.it/2012/05/diy-from-head-to-toe-10.html#more), hope you don't mind :)
ReplyDelete