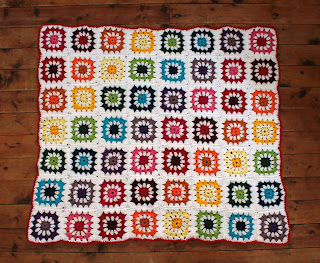
Rainbow Blanket Crochet Tutorial
A little how to for this lovely rainbow blanket!
The blanket it made up of 56 squares.
There are 2 shades of 7 different colours in the blanket (14 different colours in total).
I created 4 squares of each colour with a dark centre:
And 4 squares of each colour with a light centre:
Here is the complete set of squares you will need to make below (there are 4 in each pile):
I used one ball of acrylic wool (8 Ply) in each shade of pink, red, orange, yellow, green, blue and purple. I also used 3-4 balls of white acrylic wool (8 Ply). The finished squares measure 5 inches by 5 inches each.
The crochet hook I used is a 5.00.
To create each square:
1. Chain 6 and slip stitch to form a ring.
The hole in the centre is where you need to work from for the first round.
2. Chain 4 then double crochet (US) or treble (UK) 11 times with a single chain stitch between each to create 12 spokes as shown above. Slip stitch the last stitch to the first to create a wheel. Tie off the first colour yarn and join the white yarn.
3. Chain 4 then double crochet (US) or treble (UK) (so you have two stitches in each spoke) then chain one and continue to do two double crochets (US) or trebles (UK) and chain one into each spokes until you have 12 sets. Slip stitch the last chain one to the first stitch to create a wheel. Tie off the first colour yarn and join the next colour.
5. Repeat the same process as step 4 making sure you start with a corner of the granny square and continue put the corners in the same position as shown above!
Voila your square is done.
The next step is to join up your granny squares. If you want to use the same pattern as me see the top photo to arrange them. Or you can have fun and play around with your own set up!
To join the squares I use this method from Attic24.
To finish off edge with single crochet (US) or double crochet (UK) of red yarn as shown below:
Now sit back and snuggle under your new blanket
Raveled HERE!


that blanket looks lovely!
ReplyDeleteI love looking at crocheting. I have never tried it, but it looks lovely. Love the colors you used and the pattern is very pleasing.
ReplyDeleteYour blanket is beautiful. Love the bright, happy colors you used. Could you please tell me the approximate measurements of one finished square?
ReplyDeleteThe finished square is 5 inches by 5 inches!
DeleteAw what a pretty blanket. I love the way you've arranged the colours, it's got a very balanced feel to it
ReplyDeleteSo far I can only crochet a straight line back and forth, but each time I see a lovely granny square blankie I want to learn. I just love your blanket. So bright and cheerful. Thanks for sharing.
ReplyDeleteBeautiful colours! I've been teaching myself to knit in the last year but when I see some lovely crocheted goods, I feel the need to go back to my first love...crochet!!! Perhaps after the Christmas rush!!
ReplyDeleteThis is really lovely. I still have my stack of granny squares waiting to be joined...sigh.
ReplyDelete