Castle Writer and Police Vest Tutorial
For all of those out there itching to pull on your Writer or Police Vest and head out on a case this tutorial is for YOU!
Castle: Cool Huh?
Inspired by ABC's Castle I made this set for my girls who love to dress up as Castle and Beckett and run amok...hey let's face it who doesn't dream of that?
So let's get started!
CASTLE POLICE AND WRITER'S VEST TUTORIAL
This tutorial is based on a Size 2-4 Years Old but can be made in any size with your measurements!
Fabric Requirements
Medium Weight Navy Fabric - eg. Drill or Broad Cloth - you can work out how much fabric you need after taking your measurements. For a child's vest you will need the length from waist to waist (over the shoulder)
Black Drill - 25cm will be enough to make your patches
Iron on Interfacing for the Patch - 2 of 8 3/4 inches by 3 1/4 inches
Wadding - you will need the same length as the main fabric
White Felt - One piece
1" Nylon Strap - in black (or a different width to fit your chosen buckle) - use you guide in the tutorial to work out how much you will need.
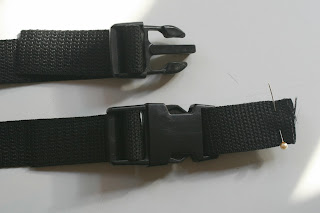
2 Black Plastic Buckle Sets - as below
Taking Measurements and Drawing the Pattern
Take measurements and add 1/2" seam allowance
If you want to make a standard size 2-4 Years old you can use the measurements as above!
Otherwise take these measurements:
A - Waist to waist over the shoulder
B - Desired width across the waist line - you might want it an inch or two past the bodyline
C - Shoulder to backdrop - I chose 2 1/2 inches for the child's vest, measure from your shoulder for desired depth for the back of the vest.
D - The front depth from your neck base to chest and add 'C'
This is a very simple pattern - the next step is to use your measurements to draw up it up as seen above. (there are two because I made different sizes for the girls).
Making the Patch
To create the lettering for POLICE and WRITER I used a word doc. and Tw Cen Mt Condensed font in Size 230.
Print out and carefully cut out each letter.
Next trace onto white felt and carefully cut out as shown below.
Next trace onto white felt and carefully cut out as shown below.
I used a felt tip pen and dotted around each letter.
Cut patch fabric - the finished size is 8 3/4" by 3 1/4" so you can add your desired seam allowance and cut 2 pieces per patch (4 in total). I added a couple of inches seam allowance to have some room for error!
Iron on interfacing to one wrong side of the patch before basting the pieces together around all four edges. Then you will be ready to position your letters on top of your patch. Ensure they are central and on a straight line - I suggest you use a ruler as you so and keep in mind the finished size. You may even want to make a window out of paper the size of the patch as a guide - I did this and it worked really well.
Please note these instructions are for a child's vest. For an adult size you may need a larger letters and patch size but this will be simple to check once you have your main vest pattern piece.
The felt I used had an adhesive side which was helpful (even though purchased by mistake) so at this stage your patches should look like mine above! Regular felt works the same as the next step is to stitch around each letter with white thread and a small stitch size (1.5 - 2).
Your patches are almost done! All you need to do it trim it down to finished size and it will be ready to be sewn onto your vest at the right time!
Making the Vest
Cut 2 of the main vest pattern in the navy fabric.
Cut 1 strip of navy for the front pockets.
These are essential for your police badge and gun....or your writer's notepad and pen!
The size should be the width of the vest by 10" (or longer for an adults vest, you can measure the height you want on the vest and double it!)
Fold the pocket strip in half, press. Lay it onto the bottom of the vest front (below the v-neck) with the folded edge at the top. Measure 3 equal pockets and stitch 2 seams as shown below. Stitch back and forth at the top of the pockets for added strength. Baste the sides and bottom of the pockets as shown below with a 1/4" seam.
Making the Straps
Using your 1 inch nylon, cut 2 lots of 4" for the vest front and 2 lots of 10" for the vest back.
If you are making an adult vest you will need to make the second lot of nylon longer than 10". Measure the gap between the vest front and back and add a few extra inches!
Melt one edge of long nylon strap as this won't be stitched in. You can do this by holding it over a flame but not touching the flame. Be careful but if you take it slow it's easy enough!
Thread the shorter nylon straps though the negative part of the buckles as shown below and pin together as shown below:
Thread the longer straps through the positive buckles with the melted end just sticking out as shown below:
Attach the shorter straps on the negative buckle just above the pocket line on the vest front as shown below. Stitch back and forth a few times to strengthen the straps.
Attach the longer straps to the vest back at the same height as the front straps. Secure by stitching back and forth a few times:
Attach the Patch
Center the front patch between the v-neck and pockets. Also center horizontally!
Use a tight zig-zag stitch all the way around to keep the patch from fraying. I used close to 0 in length and 3 in width. Test on some scrap fabric before using it on the real patch.
Repeat these steps with the back patch but have it up higher - a couple of inches from the top as shown below:
Patch Placement
So by now you are almost finished...HURRAH...so your main vest piece should look like this:
While the backing piece should be as it was when first cut!
Now to bring it all together!
Stitching it Together
Place vest pieces RIGHT side together and then add the wadding to the WRONG side of one piece as below.
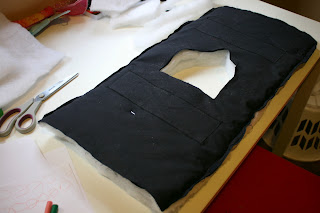
Carefully stitch around three sides of the vest sandwich - leaving the bottom of the back open. Trim all the seams and diagonally clip the corners. Make sure the wadding is trimmed as tightly as possible to the seam line to prevent bulk. Cut out the wadding in the center and trim close to the neckline.
Wadding and vest stitched...before trim...wadding side up!
Wadding and vest stitched....after trim...vest side up!
The nicely trimmed neckline!
Turn it right side out - tuck in the seam allowance of the bottom back under and top stitch 1/4". This is the section you left open when you sewed all around the vest sandwich!
Now is the perfect time to check if the neck hole is big enough to fit over your/your littlies head before you bind it!
Castle: The Killer's a Zombie
ALL GOOD!
If your child/you suffers from big head small body syndrome you just need to trim the neckline to fit.
Bind It
The final step is to bind the neckline with bias tape. You can buy a matching tape or make your own from left over fabric. I made mine by cutting a 2" wide strip - resulting in 1/2" wide finished bind around the neckline (as you can see in the final images below)! If you don't know how to attach bias binding there are loads of tutorials online. This one is my favorite!
Now you are ready to pound the pavement...and perhaps catch some criminals while write a best selling novel!
Front
Back
Made a vest or two? Send in your awesome pics and I'll post them!
And see my LITTLE CASTLE BABY screen prints HERE!


Awesome! I'm definitely going to try my hand at this- thanks for sharing :)
ReplyDeleteSpeechless! These are awesome :D You've totally made my day!!
ReplyDeleteI love Castle, what a great idea!
ReplyDeleteMy husband is a police officer, and I've been telling him I needed the "Writer" vest ever since Castle started! I might have to size this up and add a little Kevlar! :-)
ReplyDeleteThis is just about the cutest thing ever! (Mental note: must stop squealing at my monitor...)
ReplyDeleteReally I enjoy your site with effective and useful information. It is included very nice post with a lot of our resources.thanks for share. i enjoy this post. Tactical helmet
ReplyDelete